Deploying Actian OpenROAD Applications With Loadnrun
Actian Corporation
May 1, 2018

One of the main challenges for an application developer is the deployment of applications. There are many ways this is handled, from using traditional installers to web-based deployments. The initial web deployment option for OpenROAD, Actian’s rapid application development and flexible deployment solution, was the eClient where the application itself was hosted on a web server and by going to its web page the user was able to cache it locally. The successor to eClient for application deployment in OpenROAD is called Loadnrun.
Loadnrun is a simple solution for non-privileged users on Windows machines to deploy OpenROAD applications. This blog post shows an example of how to deploy an application using Loadnrun. Full instructions on how to set up Loadnrun and deploy applications can be found in the documentation (here’s the OpenROAD Server Guide for more information).
In a Loadnrun setup, the application is hosted in the OpenROAD Server installation and made available to client environments where it can be cached. When a newer version of the application is made available, the cache on the client environment is refreshed.
OpenROAD Application Prerequisites
- An OpenROAD application image or images. Confirm that the application is working by running it in a traditional OpenROAD runtime environment.
- A working OpenROAD Server installation with OpenROAD http/https gatekeepers and the Loadnrun Server option installed. For the purpose of this example, an Apache Tomcat instance was used.
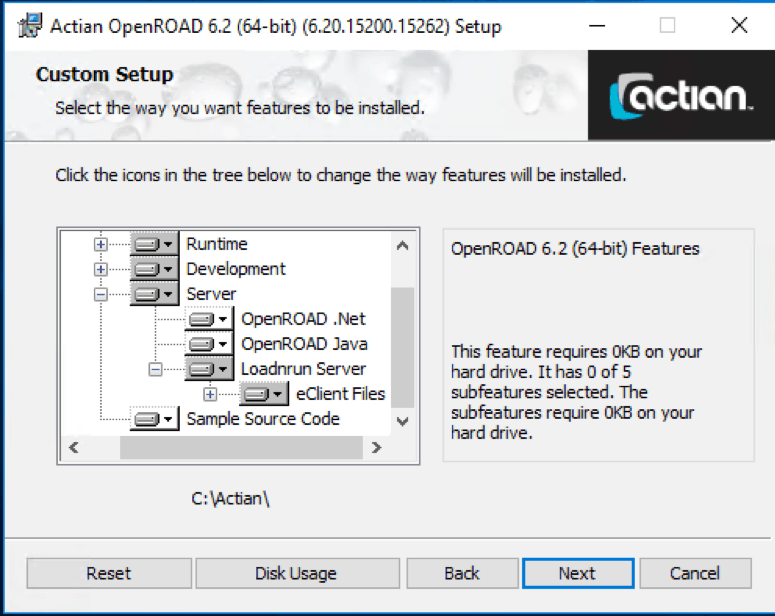
Tip: Not sure if the Loadnrun option is installed? Go to Control Panel > Programs and Features. Select Actian OpenROAD then click on Change. Verify that Loadnrun Server is installed.

- The Loadnrun installer package available for download from esd.actian.com.
Prepare the Application for Deployment
All the files that belong to the application should be placed in one directory. Here we will describe the simple case where we only have the one image file for the application. Additionally, an install4gl.txt configuration file needs to be created in the same directory. Full details about this configuration file are provided in the OpenROAD Server Guide.
We will call our application HelloWorld and for that purpose we will name the directory as HelloWorld (without a space). This can be any application, but for initial testing purposes we recommend creating a simple one that doesn’t require database connectivity, or any complex included applications. However, when comfortable with the deployment process, any application can be used. For this example, we have a helloworld.img application image file and the following install4gl.txt configuration file:
//
// Install configuration file for the Hello World application
//
4GLVERSION =1,0,0,0
IMAGEFILE =helloworld.img
CMDFLAGS =-Tyes
//
ENVIRONMENT=PATH=%II_ECLIENT_APPDIR%bin;%II_LOADNRUN62X64_ROOT%bin;%PATH%
We place these two files in the directory called HelloWorld.
Setup
Configuration on the OpenROAD Server Side
The application is deployed in the OpenROAD Server environment. This server can be installed on a different physical or virtual machine. When we are talking about copying, that may mean transferring the files to the machine where the OpenROAD server resides. The following are the steps to setup Loadnrun and store the application on the Server.
- Make sure a loadnrun.img file exists in the OpenROAD Server applications directory (II_W4GLAPPS_DIR).
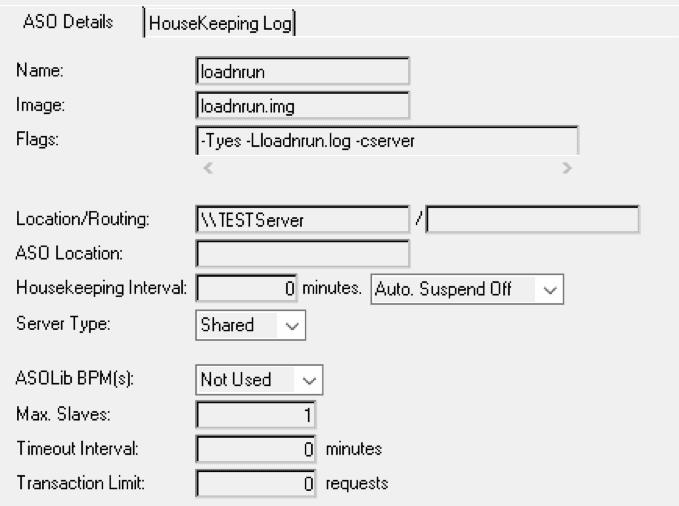
- Register a server application with the Visual OpenROAD Server Administrator called loadnrun as shown below.

Confirm that a connection to this server application is successful. - Create the subdirectory that will host the application (if it doesn’t already exist under %II_SYSTEM%loadnruneclient. In this example the directory will be called TestApp.
mkdir %II_SYSTEM%loadnruneclientTestApp
- Copy the application directory that contains the application files to the newly created directory. The application files should now reside in %II_SYSTEM%loadnruneclientTestAppHelloWorld.
Install Loadnrun on the Client
This step represents the installation of what needs to exist on the client for the application to run. In most production deployments, the installer would run silently using a response file. Examples of response files are available in the install package. For the purpose of this example we will use the interactive installer.
After downloading the Loadnrun installer from esd.actian.com, setup.exe must be run.
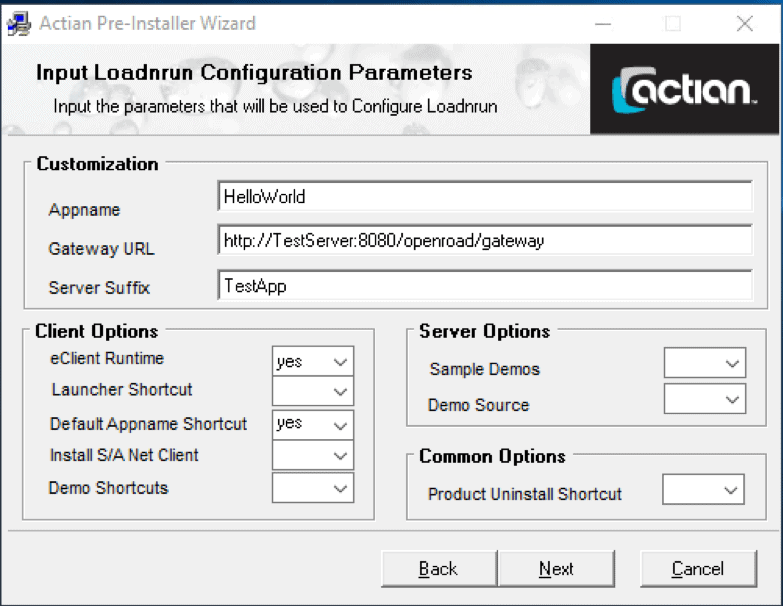
A configuration interface is shown at first:

We entered the values for the Appname, Gateway URL, and Server Suffix and only changed one flag from the defaults, Default Appname Shortcut. This is so that a shortcut for our application is installed in the Start menu.
The following values must be set:
- Appname. The name of the application. In our example it is HelloWorld (notice that there is no space). This must be the same as the name of the application directory on the server.
- Gateway URL. The URL of the OpenROAD Server gateway where the application files will hosted.
- Server Suffix. The value of a subdirectory used to host the application. This must be the parent directory of the application directory on the server.
Click next and complete the install process. Select Typical when asked what type of installation you prefer, unless you would like to make changes to the components.
Once the setup process completes, the application can be started from the client machine with the shortcut that was created during the client Loadnrun installation or from the Loadnrun Command Prompt.
For more information about OpenROAD please visit our product page here, and if you have any questions feel free to ask our active community here.
Subscribe to the Actian Blog
Subscribe to Actian’s blog to get data insights delivered right to you.
- Stay in the know – Get the latest in data analytics pushed directly to your inbox.
- Never miss a post – You’ll receive automatic email updates to let you know when new posts are live.
- It’s all up to you – Change your delivery preferences to suit your needs.